EF Core with Ubuntu Controller & Views
The Model-View-Controller (MVC) architectural pattern separates an app into three main components: Model, View, and Controller. The MVC pattern helps you create apps that are more testable and easier to update than traditional monolithic apps. The MVC project contains folders for the Controllers and Views.
Add Controller
CRUD operations are the four basic functions in the SQLite storage. Although, whatever the storage is, you must perform these basic operations. Let’s use the scaffolding tool to produce Create, Read, Update, and Delete (CRUD) pages for the Customer model in the CustomerCotroller.cs file.
Let’s run the following command to install the code generator tool for ASP.NET Core.
dotnet tool install –global dotnet-aspnet-codegenerator
Run the following command to create CustomerController with all the basic CRUD functionalities.
dotnet aspnet-codegenerator controller -name CustomerController -m Customer -dc EntityContext --relativeFolderPath Controllers --useDefaultLayout --referenceScriptLibraries
- It will create a customer controller (Controllers/CustomerController.cs)
- Razor view files for Create, Delete, Details, Edit, and Index pages (Views/Customer/*.cshtml)
- The automatic creation of these files is known as scaffolding.
Here is the code of CustomerController which contains different action methods for all the required CRUD operations such as, Index, Create, Details Edit and Delete.
using Microsoft.AspNetCore.Mvc;
using Microsoft.EntityFrameworkCore;
using MVCWithEFCore.Data;
using MVCWithEFCore.Models;
using System.Linq;
using System.Threading.Tasks;

namespace MVCWithEFCore.Controllers
{
    public class CustomerController : Controller
    {
        private readonly EntityContext _context;

        public CustomerController(EntityContext context)
        {
            _context = context;
        }

        // GET: Customer
        public async Task<IActionResult> Index()
        {
            return View(await _context.Customers.ToListAsync());
        }

        // GET: Customer/Details/5
        public async Task<IActionResult> Details(int? id)
        {
            if (id == null)
            {
                return NotFound();
            }

            var customer = await _context.Customers
                .FirstOrDefaultAsync(m => m.CustomerID == id);
            if (customer == null)
            {
                return NotFound();
            }

            return View(customer);
        }

        // GET: Customer/Create
        public IActionResult Create()
        {
            return View();
        }

        // POST: Customer/Create
        // To protect from overposting attacks, please enable the specific properties you want to bind to, for
        // more details see http://go.microsoft.com/fwlink/?LinkId=317598.
        [HttpPost]
        [ValidateAntiForgeryToken]
        public async Task<IActionResult> Create([Bind("CustomerID,Name,Description,IsActive")] Customer customer)
        {
            if (ModelState.IsValid)
            {
                _context.Add(customer);
                await _context.SaveChangesAsync();
                return RedirectToAction(nameof(Index));
            }
            return View(customer);
        }

        // GET: Customer/Edit/5
        public async Task<IActionResult> Edit(int? id)
        {
            if (id == null)
            {
                return NotFound();
            }

            var customer = await _context.Customers.FindAsync(id);
            if (customer == null)
            {
                return NotFound();
            }
            return View(customer);
        }

        // POST: Customer/Edit/5
        // To protect from overposting attacks, please enable the specific properties you want to bind to, for
        // more details see http://go.microsoft.com/fwlink/?LinkId=317598.
        [HttpPost]
        [ValidateAntiForgeryToken]
        public async Task<IActionResult> Edit(int id, [Bind("CustomerID,Name,Description,IsActive")] Customer customer)
        {
            if (id != customer.CustomerID)
            {
                return NotFound();
            }

            if (ModelState.IsValid)
            {
                try
                {
                    _context.Update(customer);
                    await _context.SaveChangesAsync();
                }
                catch (DbUpdateConcurrencyException)
                {
                    if (!CustomerExists(customer.CustomerID))
                    {
                        return NotFound();
                    }
                    else
                    {
                        throw;
                    }
                }
                return RedirectToAction(nameof(Index));
            }
            return View(customer);
        }

        // GET: Customer/Delete/5
        public async Task<IActionResult> Delete(int? id)
        {
            if (id == null)
            {
                return NotFound();
            }

            var customer = await _context.Customers
                .FirstOrDefaultAsync(m => m.CustomerID == id);
            if (customer == null)
            {
                return NotFound();
            }

            return View(customer);
        }

        // POST: Customer/Delete/5
        [HttpPost, ActionName("Delete")]
        [ValidateAntiForgeryToken]
        public async Task<IActionResult> DeleteConfirmed(int id)
        {
            var customer = await _context.Customers.FindAsync(id);
            _context.Customers.Remove(customer);
            await _context.SaveChangesAsync();
            return RedirectToAction(nameof(Index));
        }

        private bool CustomerExists(int id)
        {
            return _context.Customers.Any(e => e.CustomerID == id);
        }
    }
}
View
You create a view template file using Razor. Razor-based view templates have a *.cshtml file extension. They provide an elegant way to create HTML output with C#.
Index View
Here is the code for Views/Customer/Index.cshtml file
@model IEnumerable<MVCWithEFCore.Models.Customer>

@{
    ViewData["Title"] = "Index";
}

<h1>Index</h1>

<p>
    <a asp-action="Create">Create New</a>
</p>
<table class="table">
    <thead>
        <tr>
            <th>
                @Html.DisplayNameFor(model => model.Name)
            </th>
            <th>
                @Html.DisplayNameFor(model => model.Description)
            </th>
            <th>
                @Html.DisplayNameFor(model => model.IsActive)
            </th>
            <th></th>
        </tr>
    </thead>
    <tbody>
@foreach (var item in Model) {
        <tr>
            <td>
                @Html.DisplayFor(modelItem => item.Name)
            </td>
            <td>
                @Html.DisplayFor(modelItem => item.Description)
            </td>
            <td>
                @Html.DisplayFor(modelItem => item.IsActive)
            </td>
            <td>
                <a asp-action="Edit" asp-route-id="@item.CustomerID">Edit</a> |
                <a asp-action="Details" asp-route-id="@item.CustomerID">Details</a> |
                <a asp-action="Delete" asp-route-id="@item.CustomerID">Delete</a>
            </td>
        </tr>
}
    </tbody>
</table>
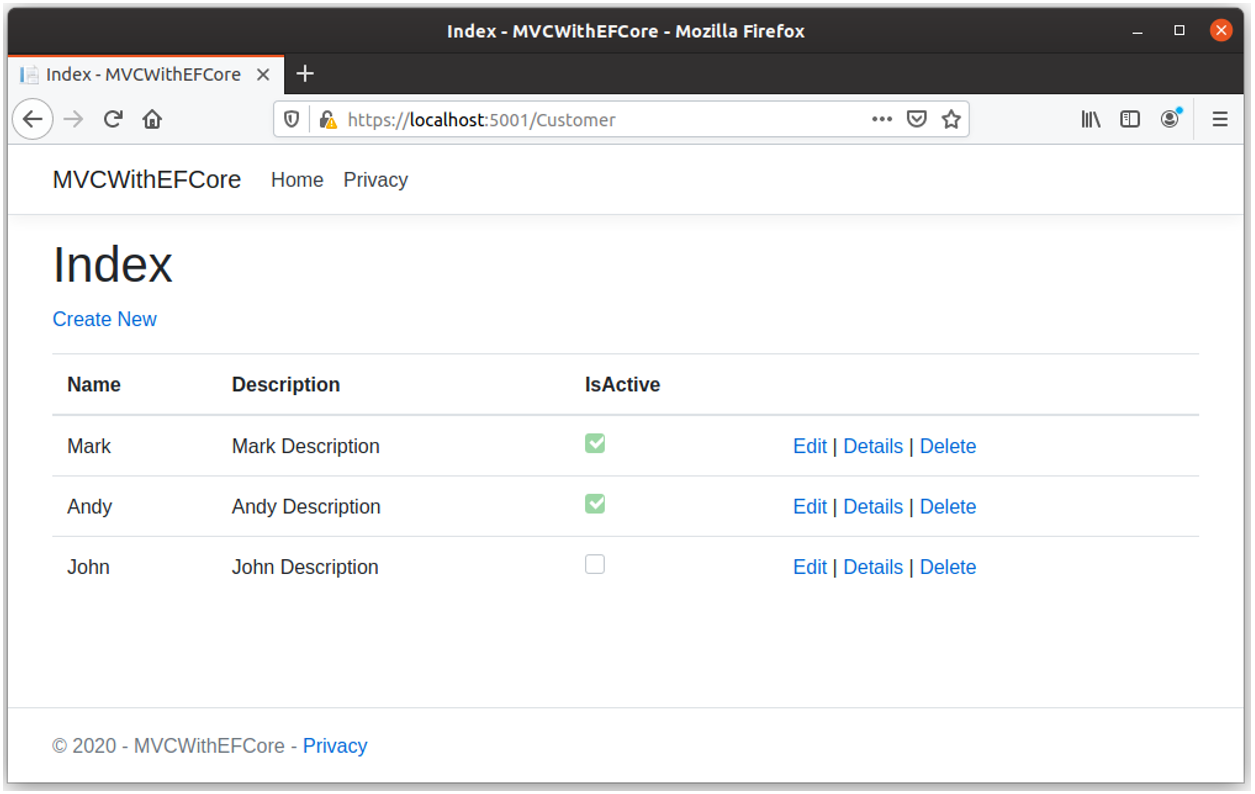
On the Index view, a list of all the customers available in the database will be displayed. You can also see a link to Create, Edit, Details and Delete views.
Create View
Here is the code for Views/Customer/Create.cshtml file
@model MVCWithEFCore.Models.Customer

@{
    ViewData["Title"] = "Create";
}

<h1>Create</h1>

<h4>Customer</h4>
<hr />
<div class="row">
    <div class="col-md-4">
        <form asp-action="Create">
            <div asp-validation-summary="ModelOnly" class="text-danger"></div>
            <div class="form-group">
                <label asp-for="Name" class="control-label"></label>
                <input asp-for="Name" class="form-control" />
                <span asp-validation-for="Name" class="text-danger"></span>
            </div>
            <div class="form-group">
                <label asp-for="Description" class="control-label"></label>
                <input asp-for="Description" class="form-control" />
                <span asp-validation-for="Description" class="text-danger"></span>
            </div>
            <div class="form-group form-check">
                <label class="form-check-label">
                    <input class="form-check-input" asp-for="IsActive" /> @Html.DisplayNameFor(model => model.IsActive)
                </label>
            </div>
            <div class="form-group">
                <input type="submit" value="Create" class="btn btn-primary" />
            </div>
        </form>
    </div>
</div>

<div>
    <a asp-action="Index">Back to List</a>
</div>

@section Scripts {
    @{await Html.RenderPartialAsync("_ValidationScriptsPartial");}
}
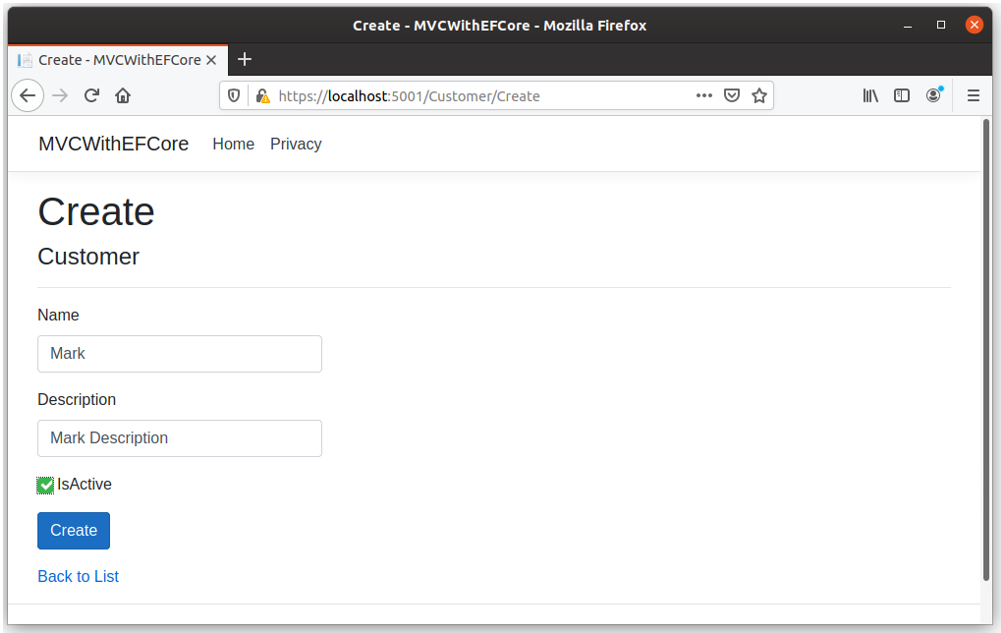
On the Create view, you can enter information for a new customer and then click the Create button, it will save it to the database.
Delete View
Here is the code for Views/Customer/Delete.cshtml file
@model MVCWithEFCore.Models.Customer

@{
    ViewData["Title"] = "Delete";
}

<h1>Delete</h1>

<h3>Are you sure you want to delete this?</h3>
<div>
    <h4>Customer</h4>
    <hr />
    <dl class="row">
        <dt class = "col-sm-2">
            @Html.DisplayNameFor(model => model.Name)
        </dt>
        <dd class = "col-sm-10">
            @Html.DisplayFor(model => model.Name)
        </dd>
        <dt class = "col-sm-2">
            @Html.DisplayNameFor(model => model.Description)
        </dt>
        <dd class = "col-sm-10">
            @Html.DisplayFor(model => model.Description)
        </dd>
        <dt class = "col-sm-2">
            @Html.DisplayNameFor(model => model.IsActive)
        </dt>
        <dd class = "col-sm-10">
            @Html.DisplayFor(model => model.IsActive)
        </dd>
    </dl>

    <form asp-action="Delete">
        <input type="hidden" asp-for="CustomerID" />
        <input type="submit" value="Delete" class="btn btn-danger" /> |
        <a asp-action="Index">Back to List</a>
    </form>
</div>
User can navigate to delete view when clicking on Delete link available on Index view and it will display the customer information which user want to delete.
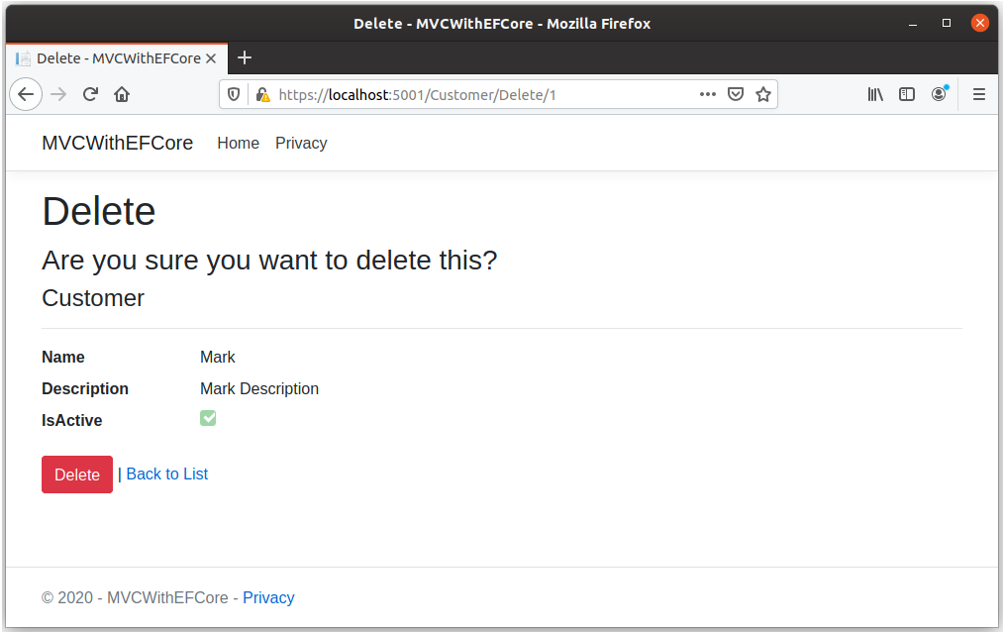
When user clicks the Delete button, it will delete this customer from the database.
Details View
Here is the code for Views/Customer/Details.cshtml file
@model MVCWithEFCore.Models.Customer

@{
    ViewData["Title"] = "Details";
}

<h1>Details</h1>

<div>
    <h4>Customer</h4>
    <hr />
    <dl class="row">
        <dt class = "col-sm-2">
            @Html.DisplayNameFor(model => model.Name)
        </dt>
        <dd class = "col-sm-10">
            @Html.DisplayFor(model => model.Name)
        </dd>
        <dt class = "col-sm-2">
            @Html.DisplayNameFor(model => model.Description)
        </dt>
        <dd class = "col-sm-10">
            @Html.DisplayFor(model => model.Description)
        </dd>
        <dt class = "col-sm-2">
            @Html.DisplayNameFor(model => model.IsActive)
        </dt>
        <dd class = "col-sm-10">
            @Html.DisplayFor(model => model.IsActive)
        </dd>
    </dl>
</div>
<div>
    <a asp-action="Edit" asp-route-id="@Model.CustomerID">Edit</a> |
    <a asp-action="Index">Back to List</a>
</div>
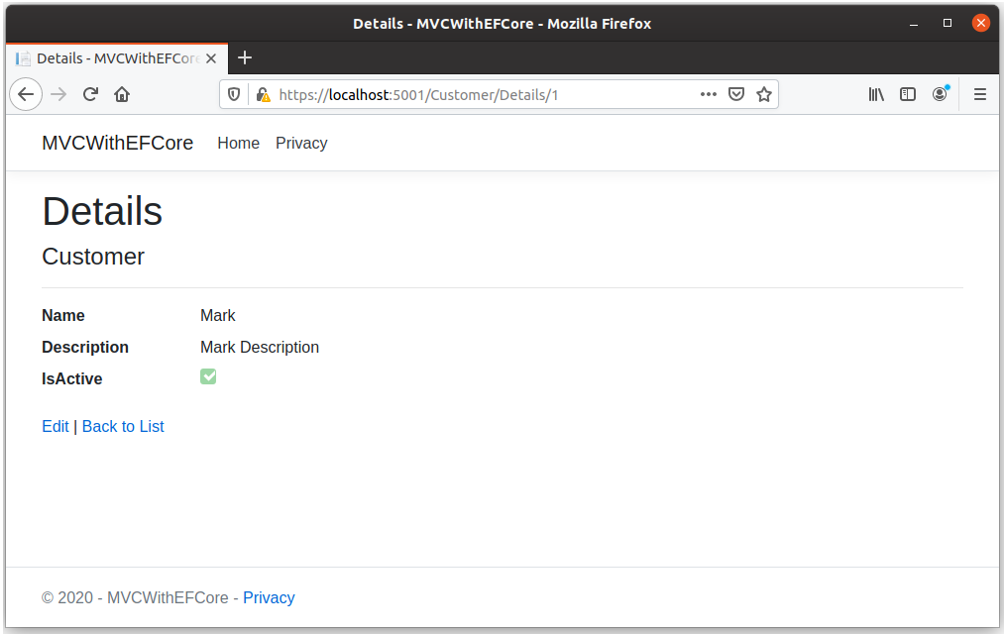
Users can navigate to details view when clicking on Details link available on Index view and it will display all the customer details.
Edit View
Here is the code for Views/Customer/Edit.cshtml file
@model MVCWithEFCore.Models.Customer

@{
    ViewData["Title"] = "Edit";
}

<h1>Edit</h1>

<h4>Customer</h4>
<hr />
<div class="row">
    <div class="col-md-4">
        <form asp-action="Edit">
            <div asp-validation-summary="ModelOnly" class="text-danger"></div>
            <input type="hidden" asp-for="CustomerID" />
            <div class="form-group">
                <label asp-for="Name" class="control-label"></label>
                <input asp-for="Name" class="form-control" />
                <span asp-validation-for="Name" class="text-danger"></span>
            </div>
            <div class="form-group">
                <label asp-for="Description" class="control-label"></label>
                <input asp-for="Description" class="form-control" />
                <span asp-validation-for="Description" class="text-danger"></span>
            </div>
            <div class="form-group form-check">
                <label class="form-check-label">
                    <input class="form-check-input" asp-for="IsActive" /> @Html.DisplayNameFor(model => model.IsActive)
                </label>
            </div>
            <div class="form-group">
                <input type="submit" value="Save" class="btn btn-primary" />
            </div>
        </form>
    </div>
</div>

<div>
    <a asp-action="Index">Back to List</a>
</div>

@section Scripts {
    @{await Html.RenderPartialAsync("_ValidationScriptsPartial");}
}
Users can navigate to edit view when clicking on Edit link available on Index view and it will display all the customer details for editing.
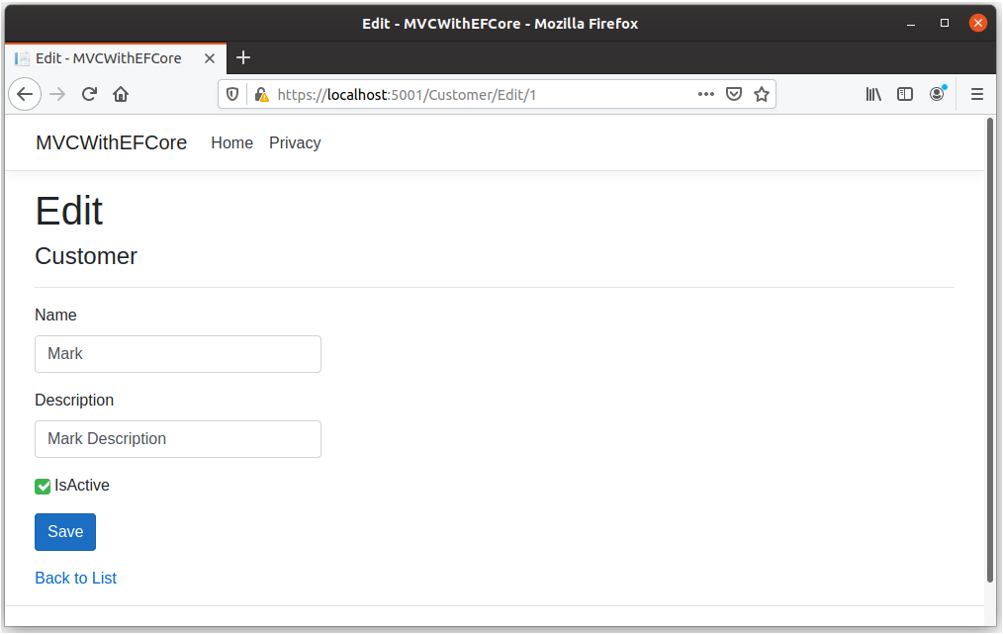
When a user clicks the Save button, it will update the customer information to the database.
Now if you are facing some problems while running the scaffolding commands, you can add the controller and all the view files manually in the specified locations.
Run the Application
Now let’s run the application using the following commands.
dotnet restore
dotnet run
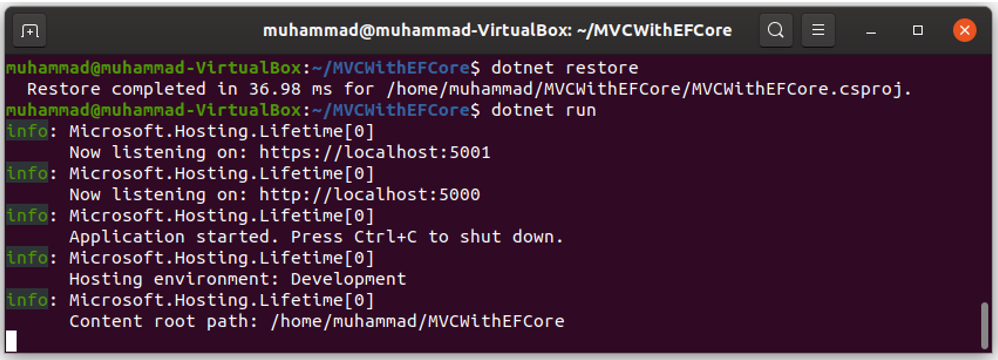
You can see the application runs successfully, let’s open the browser and enter the following URL.
https://localhost:5001/customer
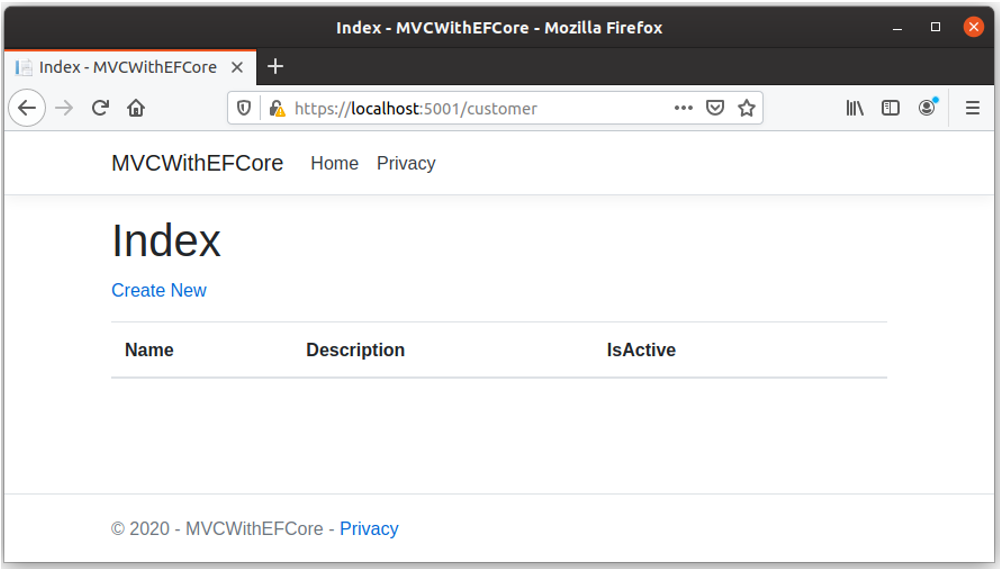
Now there is no data in the database, to add some customer records, click on the Create New link. It will open the Create view.

Enter name and description for the customer and check the IsActive checkbox and click Create button.
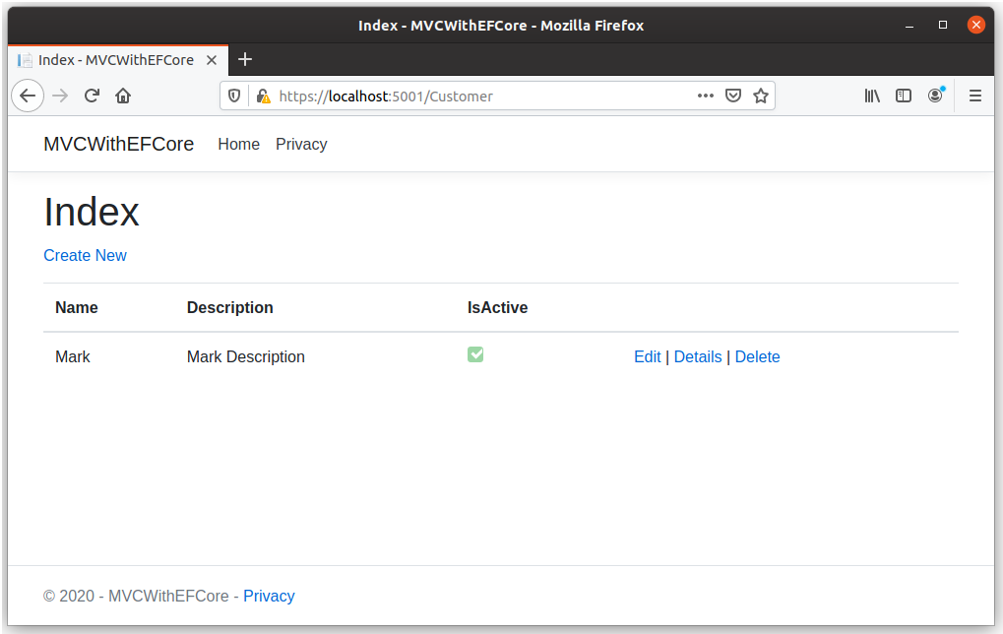
Now you can see that a customer record is added to the database.
