Ruby on Rails ActionMailer Generate a Scheduled Newsletter
Example
Create the Newsletter model:
  rails g model Newsletter name:string email:string

  subl app/models/newsletter.rb

  validates :name, presence: true
  validates :email, presence: true
Create the Newsletter controller:
  rails g controller Newsletters create

  class NewslettersController < ApplicationController
    skip_before_action :authenticate_user!
    before_action :set_newsletter, only: [:destroy]

    def create
      @newsletter = Newsletter.create(newsletter_params)
      if @newsletter.save
        redirect_to blog_index_path
      else
        redirect_to root_path
      end
    end

    private

      def set_newsletter
        @newsletter = Newsletter.find(params[:id])
      end

      def newsletter_params
        params.require(:newsletter).permit(:name, :email)
      end

  end
After that, change the create.html.erb view to the nex name. We will convert this file to and partial view which will be stored inside the Footer. The name will be _form.html.erb.
| Change name file from: | To: |
|---|---|
| app/views/newsletters/create.html.erb | app/views/newsletters/_form.html.erb |
After that set the routes:
  subl app/config/routes.rb

  resources :newsletters
Later on, we need to set the form we will use to save each mail:
  subl app/views/newsletters/_form.html.erb

  <%= form_for (Newsletter.new) do |f| %>
    <div class="col-md-12" style="margin: 0 auto; padding: 0;">
      <div class="col-md-6" style="padding: 0;">
        <%= f.text_field :name, class: 'form-control', placeholder:'Nombre' %>
      </div>
      <div class="col-md-6" style="padding: 0;">
        <%= f.text_field :email, class: 'form-control', placeholder:'Email' %>
      </div>
    </div>
    <div class="col-md-12" style="margin: 0 auto; padding:0;">
      <%= f.submit class:"col-md-12 tran3s s-color-bg hvr-shutter-out-horizontal", style:'border: none; color: white; cursor: pointer; margin: 0.5em auto; padding: 0.75em; width: 100%;' %>
    </div>
  <% end %>
And after that, insert on the footer:
  subl app/views/layouts/_footer.html.erb

  <%= render 'newsletters/form' %>
Now, install the -letter_opener- to can preview email in the default browser instead of sending it. This means you do not need to set up email delivery in your development environment, and you no longer need to worry about accidentally sending a test email to someone else's address.
First add the gem to your development environment and run the bundle command to install it.
  subl your_project/Gemfile

  gem "letter_opener", :group => :development
Then set the delivery method in the Development Environment:
  subl your_project/app/config/environments/development.rb

  config.action_mailer.delivery_method = :letter_opener
Now, create an Mailer Structure to manage the whole mailers which we will work. In terminal
rails generate mailer UserMailer newsletter_mailer
And inside the UserMailer, we have to create a method called Newsletter Mailer which will be created to contain inside on the lastest blog post and will be fired with a rake action. We will assume that you had a blog structure created before.
subl your_project/app/mailers/user_mailer.rb

class UserMailer '[email protected]'


  def newsletter_mailer
    @newsletter = Newsletter.all
    @post = Post.last(3)
    emails = @newsletter.collect(&:email).join(", ")
    mail(to: emails, subject: "Hi, this is a test mail.")
  end

end
After that, create the Mailer Template:
subl your_project/app/views/user_mailer/newsletter_mailer.html.erb

<p> Dear Followers: </p>
<p> Those are the lastest entries to our blog. We invite you to read and share everything we did on this week. </p>

<br/>
<table>
<% @post.each do |post| %>
  <%#= link_to blog_url(post) do %>
      <tr style="display:flex; float:left; clear:both;">
        <td style="display:flex; float:left; clear:both; height: 80px; width: 100px;">
          <% if post.cover_image.present? %>
            <%= image_tag post.cover_image.fullsize.url, class:"principal-home-image-slider" %>
          <%# else %>
            <%#= image_tag 'http://your_site_project.com' + post.cover_video, class:"principal-home-image-slider" %>
            <%#= raw(video_embed(post.cover_video)) %>
          <% end %>
        </td>
        <td>
          <h3>
            <%= link_to post.title, :controller => "blog", :action => "show", :only_path => false, :id => post.id %>
          </h3>
          <p><%= post.subtitle %></p>
        </td>
        <td style="display:flex; float:left; clear:both;">

        </td>
      </tr>
  <%# end %>
<% end %>
</table>
Since we want to send the email as a separate process, let’s create a Rake task to fire off the email. Add a new file called email_tasks.rake to lib/tasks directory of your Rails application:
touch lib/taks/email_tasks.rake

desc 'weekly newsletter email'
task weekly_newsletter_email: :environment do
  UserMailer.newsletter_mailer.deliver!
end
The send_digest_email: :environment means to load the Rails environment before running the task, so you can access the application classes (like UserMailer) within the task.
Now, running the command rake -T will list the newly created Rake task. Test everything works by running the task and checking whether the email is sent or not.
To test if the mailer method works, run the rake command:
rake weekly_newsletter_email
At this point, we have a working rake task which can be scheduled using crontab. So we will install the Whenever Gem which is used to provide a clear syntax for writing and deploying cron jobs.
subl your_project/Gemfile

  gem 'whenever', require: false
After that, run the next command to create an initial config/schedule.rb file for you (as long as the config folder is already present in your project).
  wheneverize .

  [add] writing `./config/schedule.rb'
  [done] wheneverized!
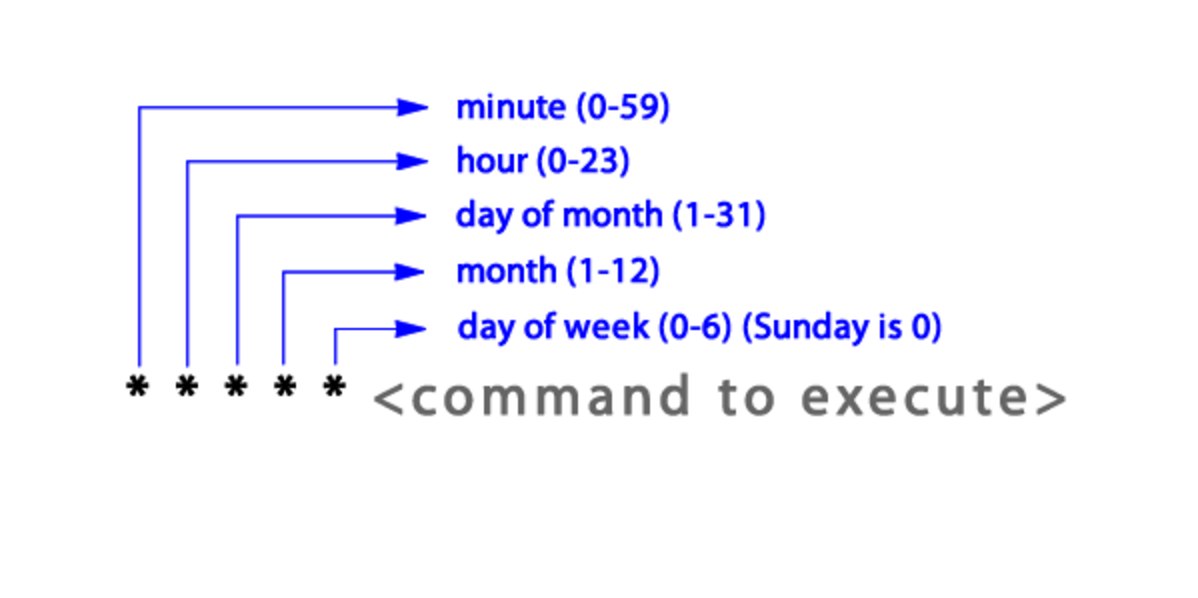
Now, inside the schedule file, we have to create our CRON JOB and call the mailer method inside determining the CRON JOB to operate some tasks without assistance and in a selected range of time. You can use different types of syntax as is explained on this link.
subl your_project/config/schedule.rb

every 1.day, :at => '4:30 am' do
  rake 'weekly_newsletter_email'
end
Now to test the Cron Job was succesfully created we can use the next command to read since terminal, our scheduled job in CRON SYNTAX:
your_project your_mac_user$ whenever

30 4 * * * /bin/bash -l -c 'cd /Users/your_mac_user/Desktop/your_project && RAILS_ENV=production bundle exec rake weekly_newsletter_email --silent'
Now, to run the test in Development Environment, is wise to set the next line on the application.rb principal file to let the application knows where are the models it will use.
  subl your_project/config/application.rb

  config.action_mailer.default_url_options = { :host => "http://localhost:3000/" }
Now to let Capistrano V3 save the new Cron Job inside the server and the trigger which will fired up the execution of this task, we have to add the next requirement:
  subl your_project/Capfile

  require 'whenever/capistrano'
And insert into the deploy file the identifier which CRON JOB will use about the environment and the name of the application.
subl your_project/config/deploy.rb

set :whenever_identifier, ->{ "#{fetch(:application)}_#{fetch(:rails_env)}" }
And ready, after save changes on each file, run the capistrano deploy command:
cap production deploy
And now your JOB was created and calendarize to run the Mailer Method which is what i want and in the range of time we set on this files.


